Friday, April 17, 2015

My final thoughts on Capture One Pro 8 and Fuji X-Trans Files

Note: I decided to use my photos from a recent trip to the Angeles Range at Lake View Terrace, California. This photo set demonstrates the amount of detail you are able to extract from a TIFF file once it has been converted from RAW. The range is set up so shooters are comfortably shaded under a long awning, while the targets are out in the open sun. Metering appropriately was extremely challenging, but you will see below that Fuji files have amazing dynamic range. All RAW files were imported into Capture One Pro 8, converted to TIFF files and imported to Lightroom for editing. Gear used: Fuji XT-1, Fuji 56mm f/1.2 and an adapted Olympus OM 24mm f/2.8

To see my previous post on Capture One Pro, click HERE

An HDR sample using three TIFF files (slightly over-cooked). Nik software was used to combine all exposures
I have spent a significant amount of time working with Capture One Pro 8 (C1P for short) and in my opinion is a far better raw converter than Lightroom 5 (LR5 for short), whether I am using Sony, Olympus, Panasonic and/or Fuji files. The files just seem to have more punch, detail and clarity - things that are extremely important to me when I deliver files to clients. While some may argue that C1P has a good starting point and that LR5 with some tweaking can get to where they want, my experience suggests otherwise. Pete Bridgewood offered some great sharpening tips for LR5 that has greatly improved Fuji Raw files, but not to the same extent as C1P to my eyes. I started to notice some artifacts in my out-of-focus areas but only at the pixel peeping levels. 

I ended up going to the range with the same co-worker who bought a Fuji X-T1 based on limited use with mine. Instead of using a dedicated scouting scope to determine where our shots land, we used the Fuji X-T1 with a terribly inexpensive Rokinon 500mm, fixed aperture mirror lens.  Optically it is nothing to write home about, but as a component for a "digital" scout scope, it worked perfectly. Due to the crop factor you get an effective field of view of 750mm. You can essentially double your range by using the magnify zoom feature. I would have never thought to do this and I'm glad he taught me another way to use my camera. 
This is a Remington 700 bolt action with an upgraded Arctic Stock. Very cool toy. For this particular shot, I did a middle of the ground metering - pretty much an average of the highlight and shadow regions. There is definitely a lot of room for recovery.

For this particular shot, I metered for the shadow areas (my co-worker). While it may seem like I had lost all of the blue in the sky, this particular time of day was overcast and gloomy. 

An hour into our range time, the clouds parted and the blue sky made an appearance. I decided to swap to my Olympus 24mm with an intent to get a little more context of the range. I metered for the hills with intent to recover the shadows. In my opinion, it did an admirable job. What do you think?
So the million dollar question: Will I transfer my post processing workflow over to C1P. The answer is unfortunately, no. Simply put, I couldn't get behind the user interface. The functionality was very backwards to me and I spent a good amount of time trying to navigate the controls.  While I liked some of the features such as the color correction wheel and color blending, I found it very lacking in the portrait touch up department. A good portion of my work is portrait photography and I fix minor blemishes very quickly and seamlessly in LR5. I find Adobe's algorithms for healing and cloning at the top of its class. I spent a good half hour trying to edit a client headshot and I could not effectively clean up the file to my standards. This ultimately made my decision for me. I primarily blame myself for not being proficient with this tool, but for what it's worth, I found the LR learning curve to be extremely low. 

This is an example of a shot where the lighting was ideal. Enough light was coming to the shooters right creating a balance, so to speak, of light. Uploading the Raw file directly to lightroom left me feeling unenthused due to the muddy details. I know I shouldn't pixel peep, but it's a way to benchmark my files. 
I added this only because I don't get many photos of myself, especially doing something cool as skeet shooting. 

Part of me feels I did not give C1P a fair shake, but I just couldn't "invest" the finite amount of time (and money) I have to a new program. What honestly put the nail in the coffin for me was Fuji's recent release of their own Raw Converter (using the Silky Pix platform). Although I find C1P far more sophisticated and "sharper", Fuji's software was good enough for my needs and more importantly it is free. I will follow up this post with more examples from Silky Pix. 

-Dino

Note: By converting your raw files to TIFF, I noticed I lost my ability to use the popular camera profiles Fuji is known for. I personally am a huge fan of the Classic Chrome profile and not being able to utilize it as a creative tool was a little disappointing. If anyone knows a work around for this, I would greatly appreciate the advice


Monday, April 6, 2015

My Love Affair with Fuji - An Instax Believer

Don’t tell Olympus or Sony, but my love affair with the Fuji brand is growing with each day. Although I have been writing about the Fuji X-T1 quite a bit, I would say it is their offering of instant film products that has me head over heels. Their X-series mirrorless cameras have impressed me thus far, but still have a lot of room to improve like all mirrorless cameras. For now, I am blissfully using it as another photographic tool, but I will save that for another post.


What is it about the Instax products that appeal to me so much, you may wonder. Before I started shooting in the digital age, I had a point and shoot film camera that I pretty much took everywhere I went – from family gatherings, middle school dances to our local ice skating rink. It was small, easy to use and created physical memories that I could hold on to and enjoy with my friends/family.


Dropping off film at my local Target and waiting an hour for it to develop was similar to the anticipation of opening presents on Christmas Day. I even bought Fuji 800 Speed film packs mainly because they were more affordable than Kodak. Out of focus, motion blur, discoloration were all acceptable to me just as long as the subject was interesting. In the digital age, I notice I obsess more about sharpness, color, chromatic aberration, moirĂ©, vignetting and all the other factors that I probably shouldn't really be paying much attention to. With film we often hear people describe its inherent flaws as characteristics of the medium. Don't get me wrong, I would still rather work with the digital format, but in my eyes there’s still something appealing about film and it's ability to create something tangible without the need to post process. 

We learned the hard way, not all Sharpies are created equal. If you plan on writing on the Instax prints make sure you use the permanent ink variant (as labeled on the pen) as to avoid smearing.
For our wedding project, we decided to avoid powering the Fuji SP-1 printer with batteries.  Instead we opted to use a CAIUL USB Power Cable (available on amazon for ~$13) and an external rechargeable battery pack.  In my opinion, this is a more reliable way to power the printer

Fuji is able to scratch that film itch and continue to give me something physical to enjoy again. I raved about my recent acquisition of the SP-1 printer - Click HERE for my review.  I loved it so much, I even found a way to incorporate it in our wedding, which had a photography theme. My lovely fiance, now my wife, gave me the green light to buy over 200 sheets of Instax mini film and we printed out table cards for all of our 170+ guests. In the digital world, where all of our photography is mostly shared on Google+ and Facebook, it is so refreshing to share our work through a tangible medium. Even though the print quality will never match that of a professional grade printer, it is still something people can spend time holding, examining, and keeping for years to come. Many have commented that these table cards were a unique way of displaying our Disney photography and showing off our personality. To this day, I see these table cards posted on our friends'/family's refrigerators. 


A special thank you to Efong Chiu over at EmaginePixel for taking these photos. Pinterest gave us the idea of using a canvas to hang all of our prints (painted by our amazingly talented brother, John Pelico III).  We stapled and taped string across and hung them with mini clothes pins (eBay is the best place to get these pins - I got 200 for under $20). A table top easel was used to keep the painted canvas upright.

Fuji's contribution to our wedding didn't end there. We asked our usher to take candid photographs with the Fuji Instax 210 camera. This camera should not be mistaken with the mini versions that take the same film packs as the SP-1 Printer, Mini 8 or the hipster-friendly NEO 90. In my opinion, the 210 wide film is a much more favorable format at 9.9cm x 6.2cm than say Polaroid's 7.5cm x 7.5cm. For some reason, I just can't get behind the square format and is the sole reason why I do not use Instagram on a regular basis. Besides being more conducive for portrait, landscape and group shots for my style of photography, the film packs are significantly more affordable than Impossible Project's (a third party manufacturer who is known for making film for Polaroid cameras) and are far less temperamental. I have a hard time recommending Polaroid to people who want to get into instant photography especially after what I had seen on the Tony Northrup YouTube channel. 


Our custom made, Etsy ordered, wedding album dedicated to Fuji Instax products
Heather and I invested (and I wholeheartedly mean the word invested) in an additional 200 sheets of wide film and boy did it pay off. Our Usher went above and beyond what I had originally intended and spent the entire night documenting the festivities...that is until my father punched the camera out of his hand while dancing with my Mom. Although the camera did not survive the accident, we were able to walk away with over 150 frames and we are incredibly excited to build our wedding album/scrapbook.


The opening page to our book. All the photos were developed with the FujiFilm SP-1 Printer. A special thanks to Rachel B. Photography and EmaginePixel for  their great contributions to our memories
The wide prints fit perfectly in our album. We used adhesive photo corners, which can be purchased at any arts and crafts store, to adhere the photos to our album.

Just a small sample of our Instax collection. Instead of having our guests sign a guest book, we had them leave us a message on the Instax photo themselves. It makes sifting through these photos a much more enjoyable experience. 

On my main website I have a tagline that states: "A good photo is an investment that doesn't lose interest". In fact, I believe photographs are one of the few things that gain exponentially more personal  and sentimental value as time progresses.  I may sound a little too adamant, even dogmatic, about printing, but I have come from a place where I almost lost 1 years worth of photographs due to a failed hard drive. Our memories should not live and die on our computer and the Fuji Instax products help me easily and conveniently practice what I preach. To date, no other company is able to scratch my nostalgic film itch at such an affordable price point. After spending thousands of dollars on a wedding, it is so nice to be able to instantly enjoy and reminisce one of the happiest days of my life. My wallet typically follows my heart and at the rate Fuji's going, they will continue to keep me as a loyal customer. 

Monday, March 16, 2015

Hiking with the Olympus E-M1 and the 12-40mm f/2.8 Pro Lens - Bridge to Nowhere

I have been a prime lens shooter from the start and to this day I would rather carry two bodies and two primes than carry a zoom lens. Speaking only for myself, I find zooms make me lazy with my composition. Instead of walking back or moving closer to my subject, I tend to use my zoom ring to do the heavy lifting. I can go on and on about my thoughts about zooms vs. primes, but considering my last adventure with my groomsmen and groomsgals, I had no choice but to use my E-M1 and the Olympus Pro Zoom. Why, you ask?  It is my only weather sealed combo and I heard from one of my bestmen (that's right I had 2) the possibility of getting wet was extremely high. He was right, I got wet but my camera did not =). 

On so many occasions I have thought about selling this lens, but this trip made me realize that this piece of glass is a keeper. What particularly stood out was how sharp this lens is after processing my RAW files through Capture 1 Pro (I would export TIFF files from C1P and import to Lightroom, my preferred editor - more on this in another post). Additionally, I loved how close I could get with some of my shots. You will see below some of the close ups I took while on the Bridge to Nowhere hike - a 10 mile round trip hike out in the San Gabriel Mountains, which I highly recommend to all Southern California residents. At the end of the day, I found this lens/camera combo a pleasure to use. While it may be larger than other m43 gear, not once did I feel the weight even after 6+ hours of walking on stones, tightrope walking across creek logs and scaling mountain ledges.    

I want to keep this post short on words, and heavy on images. I had no real processing style for this set. I merely wanted to test out some the cool VSCO presets I've neglected for the past year and a half. I was leaning towards the Fuji and Polaroid sets. Happy viewing 

Meet Vince, our adventure guru and the cousin who is always down to go on an adventure.
The organizer and co-best man 

Sunday, March 8, 2015

A Tribute to my Brother, THE Artist

And....I'm back! Well, sort of. Heather and I are now back to work and trying to come down from our post wedding high. It really has been a tough transition getting back into my groove since there have been a lot of changes going on at work, plus we're being audited (this happens annually). Work on the photography end has been picking up thanks to my buddy Efong over at EmaginePixel - a birthday party last week and a wedding yesterday. I normally would rule out all weddings, but if there is anyone who could get me to be a second, it would be him. 

Now that we are on the topic of weddings, I have been going back and forth on whether or not I should share our montage even before I saw what my brother had done for us. I struggle on whether or not this would be too personal, self-serving or even boring to anyone reading my blog, considering it is about me and my wife. However, the moment I saw the video I felt nothing but pride and inspiration. I have said it before and I will say it again, I never saw myself as an artist. I say this as not to fish for praise but because I feel I merely capture what is around me - the subject itself is art. My brother, Luigi Aranda, on the other hand is THE artist in the family/team because in my eyes he creates. Like individual brush strokes on a canvas, he put together video clips/music/graphics that is not only meaningful but it also drives the whole gamut of emotions. What he did for us was genuinely a labor of love which we are forever grateful for.

Now you must be thinking, how does this all relate to this blog?Well, all the footage he took was taken with either an Olympus OMD E-M1, a Panasonic GM1 or the Panasonic GF3 - mirrorless cameras I rave about all the time. I am incredibly proud of my brother's talents and encourage him to keep it up.

For the video please click the link below.

Thursday, February 19, 2015

Why We've Been So Quiet

My goal for myself for 2014 and 2015 was to have a blog post once a week. Whether it is a review, a photo essay or an opinion piece, I wanted to keep this blog full of content. However, for the last two weeks, I have "neglected" this site and for good reason...I've been preparing for a wedding and in a couple of days, I will be married to the most beautiful and amazing person I know.  

Photo taken by the great Efong Chiu of EmaginePixel Photography. 
Although I've been removed from this blog and might be for the next week, I am incredibly excited to write about a few of my new old lenses I have acquired from eBay, including an amazing China-made focal reducer for my Fuji X-T1. You can expect a blog post about the following pieces of gear in the very near future:
  • The Zhong Yi Lens Turbo II - M42 to Fuji X Mount
  • The Tokina EL 28mm f/2.8 Lens - M42 Mount
  • The Super Takumar 55mm f/1.8 - M42 Mount
  • The Super Takumar 50mm f/1.4 - M42 Mount
  • The Russian made Helios 44-4 58mm f/2 - M42 Mount
Until then, thanks for stopping by and reading. 

So say we all,
Dino

Tuesday, February 3, 2015

Raw Converters - Lightroom versus Capture One Pro

In my constantly evolving mission to see whether I should be a 3 system photographer, I venture into the RAW files produced by my Fuji X-T1. Before I turn this into another one of my reviews, I will say that when I first opened the raw files in Lightroom, I was taken aback by how smudgy some of the details look at 100%. I have heard reports about how Lightroom version 5.4 (and higher) has done a better job with their demosaicing of the Fuji X-Trans RAW files, but to my eyes it was just shy of being great.  Now don't get me wrong, I still like the files produced by the X-T1 paired with the 56mm f/1.2, but I want to be sure I get the most out of my files even if it means using a different RAW converter.

My initial search for a new converter led me to Iridient Developer. From what I have read online it is one of the best, if not the best converters for Fuji RAW files. The biggest problem - I don't own a Mac computer. ID would have been the perfect tool as it would have integrated with Lightroom seamlessly. As I continued my search, the name Capture One Pro (which I will  now refer to as C1P) kept popping up. I figured it wouldn't hurt to try it out since they offer a 30 day free trial. I am only days into my testing and immediately, I can tell you I have found a difference in the amount of detail and sharpness in my files. I generated a TIFF file from C1P and synced the image in Lightroom to do a one to one comparison. Exposure and color aside, it is pretty clear Capture One Pro is the winner - the screen grab will not do it justice.

Note: all of the screen grabs below have not been edited. All files are at their default setting. 

FujiFilm RAW X Trans File Comparison

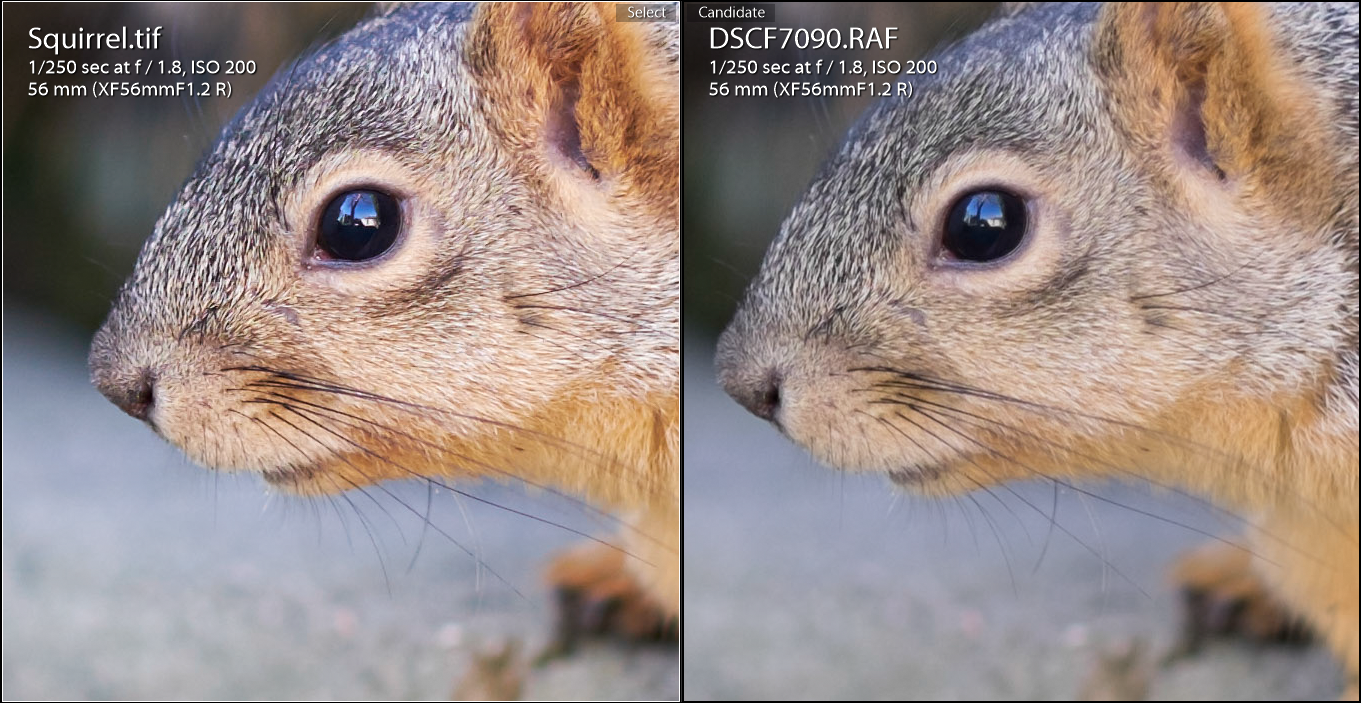
RAW file converted in CP1 on the LEFT and RAW file converted in LR on the RIGHT.  Looking at the fur on the top of the squirrel's head it is clear C1P has far more contrast, clarity and detail. I initially thought I had misfocused, but upon viewing the file in C1P it was clear to me that LR was the "problem"
This immediately sparked my interest and made me consider the differences  in how LR converts my Sony and Olympus files. The results surprised me because I heard the root of the problem was how Adobe products dealt with this files produced by Fuji's unconventional sensor layout. I won't pretend to know coding and/or the demosaic process, but I could only imagine how the arrangement of the blue, red and green pixels could pose a problem. I found a very interesting blog post by ChromaSoft that goes into great detail about the topic if you want to read more about it (I can't comment on the accuracy of the article but it is compelling nonetheless). Otherwise, I will just provide samples from both Sony and Olympus RAW files. 


Traditional sensor layout vs. Fuji X-Trans

Sony Alpha A7 RAW File Comparison

RAW file converted in LR on the LEFT and RAW file converted in C1P on the RIGHT. Like the Fuji files, I noticed far more contrast and clarity with C1P's conversion. The eye shadow and pupil has a lot more punch and the fine details in the skin are more pronounced. Even the rendering of colors are slightly different. From a sharpness standpoint, Capture One Pro is the clear winner

Olympus OMD E-M1 RAW File Comparison

RAW file converted in C1P on the LEFT and RAW file converted in LR on the RIGHT. Given the results I have found with my Sony and Fuji X Trans files, it wasn't a surprise C1P brought out the most detail. In fact, I am inclined to bring down both the Clarity and Contrast sliders in touching up this particular headshot.
RAW file converted in LR on the LEFT and RAW file converted in C1P on the RIGHT. I decided to throw in clothing to show how both are rendered. 
Although I am only a few days into testing Capture One Pro, to me it's clear who has the better raw converter. However, in the next three weeks, I will see which software offers the best user experience. At the moment there are a lot of features I like, but there are other aspects that seem a bit backwards or counter intuitive to me. I'll chalk it up to growing pains for now. Expect a report about my one month trial period in the coming weeks. Only then can I truly say if I find the "upgrade" worth the price. Thanks for stopping by.  

Wednesday, January 28, 2015

Flashpoint RoveLight 600 ws Monolight Review - A love-hate relationship

Not too long ago I had written about my experience purchasing the Flashpoint RoveLight 600 ws light from Adorama. While I still hold the opinion that I had one of the worst consumer experiences shopping at Adorama (just save yourself the trouble and shop at B&H), I must say they offer a product that is highly usable and portable at a very good price point. It is far from being perfect, but it allows me to take my “studio” practically anywhere I want.


Let’s start with the bad. For one you have to go through Adorama…OK, fine I will stop poking fun at that company, but shortly after I bought the lights, I found out that they do not service any of their equipment. They do offer a two year warranty on their strobes but cannot repair issues that may come up. In fact, this reviewer on YouTube confirmed this (see video HERE). I really can't complain because I feel if I get two years of consistent use (and I have used these a lot), then in my mind I will get my money's worth. There's no one else but me to blame for not doing my research and it's the cost of being an early adopter. Let's just hope I don't get burned too badly.

Sample studio shoot with the RoveLight 600ws paired with a 22" beauty dish. Four lights were used, 3 of which are from the Godox line of  speedlights. At the bottom of the post you will see how I made it all work
Another studio variant using only 2 lights - RoveLight with beauty dish as main with a reflector for fill

The fluctuation in power output is probably the biggest flaw with this unit. At high levels (half power to full power), I find terrible consistency in power output. Just look at the histograms below. The one to the left is the first shot taken at 1/1 power and the one on the right was the second shot taken the moment I heard a beep. The drop in power was significant but not unfixable in post. To avoid this problem, all you have to do is wait a second or two after the beep for the capacitor to fully re-cycle. Unless you are using Profotos, I wouldn’t expect a high level of speed and consistency. In fact, I would have preferred longer re-cycle times to mitigate this issue. However, I did notice at lower powers the power differential isn't so severe.  


For me the *Godox RT-16 trigger system has a perfect balance of functionality, control-ability and value. It goes without saying that there are far more sophisticated systems out there with bells and whistles galore (the Paul C Buff commander trigger comes to mind), but you will not find a reliable trigger like the RT-16 in the $20 to $30 range. The Rove Light trigger is really a step back in some ways. For one it uses these awful watch batteries. WHY? I won't ding Adorama for giving me a dead battery, but boy was it frustrating finding a replacement. I had to go to a specialty battery store to get one and I bought a spare just in case. The next thing that confuses me is the inability to control power levels of multiple Rove Lights with a single trigger. If you happen to own two or more units and want to individually control the power levels, you would need additional triggers set to different channels and a master on your camera hot shoe set to a fire all (Channel 15 will fire all lights regardless of what channel they are on). Flashpoint didn't really think this through. Besides having an integrated battery, half the appeal of this system to me is not having to physically walk to your monolight to adjust the power. This is what you are relegated to IF you choose not to carry multiple triggers (they're not cheap either). If there is a work around to this issue, someone please tell me. Overall, the convenience of this system outweigh its flaws 

*Despite being a proprietary unit for the Godox line, you can integrate other non-Godox units by using a Cells II Trigger. See the bottom of the post for more information on how to integrate the RoveLight with Godox units. 

Above are my favorite inexpensive triggers, the RT-16. You can purchase this trigger and receiver for around $20 to $30. The Rove Light spare trigger cost $70. Adorama is out of their mind. I would pay $70 if they ever decide to upgrade the triggers to be more like the ones above, but not definitely not for current design.
My final and minor gripe with the system is the small LCD screen on the back of the unit. Unless you are directly in front of the monolight, I found it difficult to tell what power level and/or setting I was at. It doesn't help that the triggers don't have a display like the RT-16s above.

A one light set up. I purposefully placed the family in the shade for the both their sake and the baby. 
While it may seem like I hate these lights, I am actually quite fond of this unit. Like all things in the photography world, there isn't a perfect light. Below is a list of all the things I love about using these monolights:
  • It is a light weight system - almost as heavy as my DE300 with a battery in it. 
  • Feels like a quality product. The mounts feel strong and secure
  • Receiver is built into the monolight and the trigger is brand agnostic - it works with my Sony A7, Olympus OMD E-M1 and the Fuji X-T1
  • It's a very cheap alternative to Profotos. Although not in the same league, the basic experience, usability and functionality is there
  • Uses bowens s-mount modifiers. Highly compatible with a lot of modifiers I already own
  • Fast recycle times, but see power consistency issues mentioned above
  • No noticeable changes in color temperature throughout entire range
  • Nice even spread of light even with just the stock reflector
  • The modeling light may not be very strong, but it can definitely help during evening shoots. 
These lights are perfect for the beach.  This shot was taken with just the standard reflector. 

The Rove Light has an extremely high convenience factor – more convenient than using a Godox AD360 or multiple speedlights. With the AD360 I sometimes find the battery pack can swing around awkwardly during adjustment. Combining speedlights can be a bit cumbersome as well. With the Rove Light, you just pop the battery in and mount the unit on a light stand and you're ready to take pictures - no other components are needed besides your light modifier. I think it really says a lot about these lights that I have taken them with me on my last seven assignments. Despite its shortcomings and apparent limitations these lights are simply easy to use and work without a hitch. Not once did I have a miss fire and the battery held up well. Let's just hope these lights stand the test of time. If I find any other issues, you can bet I will update this blog post. For now, I am pretty happy with this unit despite its limitations. 


So say we all,

Dino


Note - To those who have been following my blog for a while now, you may be wondering why I bought these lights considering I am so invested in the Godox/Cheetah ecosystem. All I needed to integrate the Rove Light with my current line of Godox monolights, speedlights and barebulb flash units is a CellsII trigger. I mounted the RoveLight trigger onto the hotshoe slot and I was ready to go. The RT-16 was mounted on my camera and it worked flawlessly. The very first shot in this blog post was taken with four lights and this was how I made it all work together.