Showing posts with label Raw Converters. Show all posts

Friday, April 17, 2015

My final thoughts on Capture One Pro 8 and Fuji X-Trans Files

Note: I decided to use my photos from a recent trip to the Angeles Range at Lake View Terrace, California. This photo set demonstrates the amount of detail you are able to extract from a TIFF file once it has been converted from RAW. The range is set up so shooters are comfortably shaded under a long awning, while the targets are out in the open sun. Metering appropriately was extremely challenging, but you will see below that Fuji files have amazing dynamic range. All RAW files were imported into Capture One Pro 8, converted to TIFF files and imported to Lightroom for editing. Gear used: Fuji XT-1, Fuji 56mm f/1.2 and an adapted Olympus OM 24mm f/2.8

To see my previous post on Capture One Pro, click HERE

An HDR sample using three TIFF files (slightly over-cooked). Nik software was used to combine all exposures
I have spent a significant amount of time working with Capture One Pro 8 (C1P for short) and in my opinion is a far better raw converter than Lightroom 5 (LR5 for short), whether I am using Sony, Olympus, Panasonic and/or Fuji files. The files just seem to have more punch, detail and clarity - things that are extremely important to me when I deliver files to clients. While some may argue that C1P has a good starting point and that LR5 with some tweaking can get to where they want, my experience suggests otherwise. Pete Bridgewood offered some great sharpening tips for LR5 that has greatly improved Fuji Raw files, but not to the same extent as C1P to my eyes. I started to notice some artifacts in my out-of-focus areas but only at the pixel peeping levels. 

I ended up going to the range with the same co-worker who bought a Fuji X-T1 based on limited use with mine. Instead of using a dedicated scouting scope to determine where our shots land, we used the Fuji X-T1 with a terribly inexpensive Rokinon 500mm, fixed aperture mirror lens.  Optically it is nothing to write home about, but as a component for a "digital" scout scope, it worked perfectly. Due to the crop factor you get an effective field of view of 750mm. You can essentially double your range by using the magnify zoom feature. I would have never thought to do this and I'm glad he taught me another way to use my camera. 
This is a Remington 700 bolt action with an upgraded Arctic Stock. Very cool toy. For this particular shot, I did a middle of the ground metering - pretty much an average of the highlight and shadow regions. There is definitely a lot of room for recovery.

For this particular shot, I metered for the shadow areas (my co-worker). While it may seem like I had lost all of the blue in the sky, this particular time of day was overcast and gloomy. 

An hour into our range time, the clouds parted and the blue sky made an appearance. I decided to swap to my Olympus 24mm with an intent to get a little more context of the range. I metered for the hills with intent to recover the shadows. In my opinion, it did an admirable job. What do you think?
So the million dollar question: Will I transfer my post processing workflow over to C1P. The answer is unfortunately, no. Simply put, I couldn't get behind the user interface. The functionality was very backwards to me and I spent a good amount of time trying to navigate the controls.  While I liked some of the features such as the color correction wheel and color blending, I found it very lacking in the portrait touch up department. A good portion of my work is portrait photography and I fix minor blemishes very quickly and seamlessly in LR5. I find Adobe's algorithms for healing and cloning at the top of its class. I spent a good half hour trying to edit a client headshot and I could not effectively clean up the file to my standards. This ultimately made my decision for me. I primarily blame myself for not being proficient with this tool, but for what it's worth, I found the LR learning curve to be extremely low. 

This is an example of a shot where the lighting was ideal. Enough light was coming to the shooters right creating a balance, so to speak, of light. Uploading the Raw file directly to lightroom left me feeling unenthused due to the muddy details. I know I shouldn't pixel peep, but it's a way to benchmark my files. 
I added this only because I don't get many photos of myself, especially doing something cool as skeet shooting. 

Part of me feels I did not give C1P a fair shake, but I just couldn't "invest" the finite amount of time (and money) I have to a new program. What honestly put the nail in the coffin for me was Fuji's recent release of their own Raw Converter (using the Silky Pix platform). Although I find C1P far more sophisticated and "sharper", Fuji's software was good enough for my needs and more importantly it is free. I will follow up this post with more examples from Silky Pix. 

-Dino

Note: By converting your raw files to TIFF, I noticed I lost my ability to use the popular camera profiles Fuji is known for. I personally am a huge fan of the Classic Chrome profile and not being able to utilize it as a creative tool was a little disappointing. If anyone knows a work around for this, I would greatly appreciate the advice



Tuesday, February 3, 2015

Raw Converters - Lightroom versus Capture One Pro

In my constantly evolving mission to see whether I should be a 3 system photographer, I venture into the RAW files produced by my Fuji X-T1. Before I turn this into another one of my reviews, I will say that when I first opened the raw files in Lightroom, I was taken aback by how smudgy some of the details look at 100%. I have heard reports about how Lightroom version 5.4 (and higher) has done a better job with their demosaicing of the Fuji X-Trans RAW files, but to my eyes it was just shy of being great.  Now don't get me wrong, I still like the files produced by the X-T1 paired with the 56mm f/1.2, but I want to be sure I get the most out of my files even if it means using a different RAW converter.

My initial search for a new converter led me to Iridient Developer. From what I have read online it is one of the best, if not the best converters for Fuji RAW files. The biggest problem - I don't own a Mac computer. ID would have been the perfect tool as it would have integrated with Lightroom seamlessly. As I continued my search, the name Capture One Pro (which I will  now refer to as C1P) kept popping up. I figured it wouldn't hurt to try it out since they offer a 30 day free trial. I am only days into my testing and immediately, I can tell you I have found a difference in the amount of detail and sharpness in my files. I generated a TIFF file from C1P and synced the image in Lightroom to do a one to one comparison. Exposure and color aside, it is pretty clear Capture One Pro is the winner - the screen grab will not do it justice.

Note: all of the screen grabs below have not been edited. All files are at their default setting. 

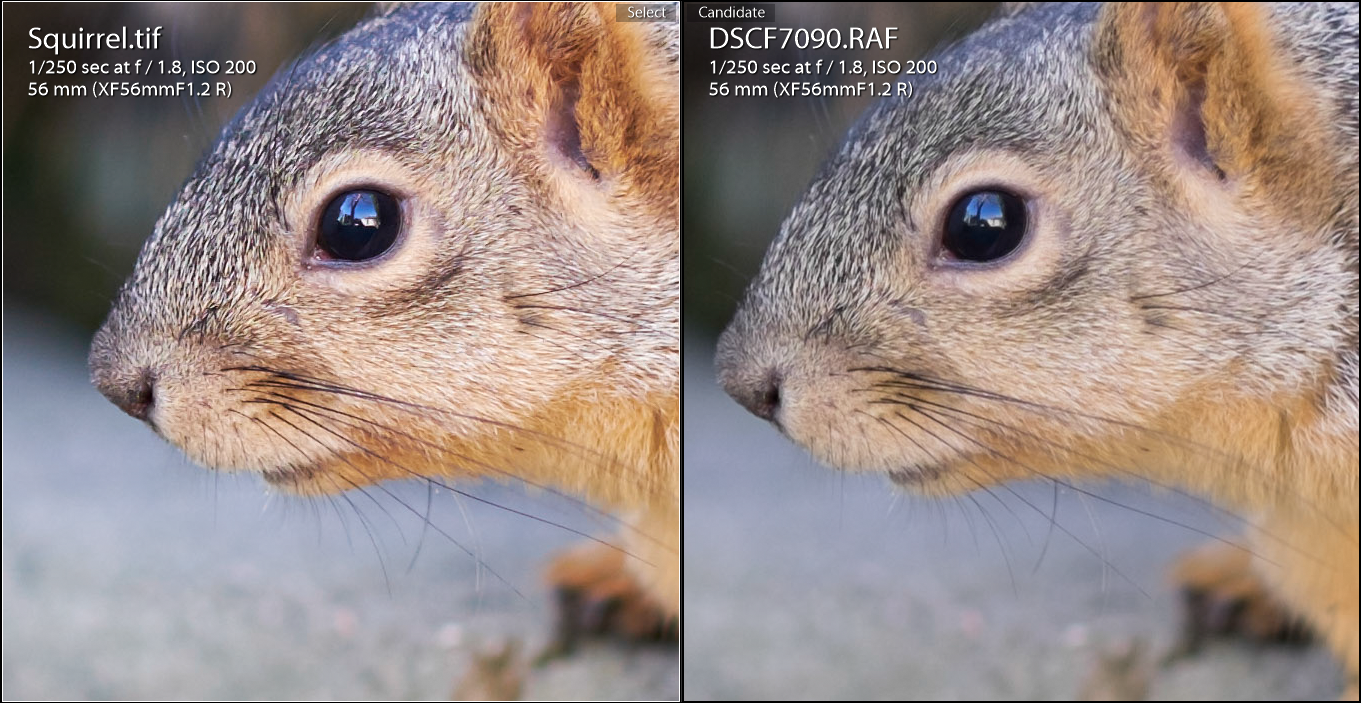
FujiFilm RAW X Trans File Comparison

RAW file converted in CP1 on the LEFT and RAW file converted in LR on the RIGHT.  Looking at the fur on the top of the squirrel's head it is clear C1P has far more contrast, clarity and detail. I initially thought I had misfocused, but upon viewing the file in C1P it was clear to me that LR was the "problem"
This immediately sparked my interest and made me consider the differences  in how LR converts my Sony and Olympus files. The results surprised me because I heard the root of the problem was how Adobe products dealt with this files produced by Fuji's unconventional sensor layout. I won't pretend to know coding and/or the demosaic process, but I could only imagine how the arrangement of the blue, red and green pixels could pose a problem. I found a very interesting blog post by ChromaSoft that goes into great detail about the topic if you want to read more about it (I can't comment on the accuracy of the article but it is compelling nonetheless). Otherwise, I will just provide samples from both Sony and Olympus RAW files. 


Traditional sensor layout vs. Fuji X-Trans

Sony Alpha A7 RAW File Comparison

RAW file converted in LR on the LEFT and RAW file converted in C1P on the RIGHT. Like the Fuji files, I noticed far more contrast and clarity with C1P's conversion. The eye shadow and pupil has a lot more punch and the fine details in the skin are more pronounced. Even the rendering of colors are slightly different. From a sharpness standpoint, Capture One Pro is the clear winner

Olympus OMD E-M1 RAW File Comparison

RAW file converted in C1P on the LEFT and RAW file converted in LR on the RIGHT. Given the results I have found with my Sony and Fuji X Trans files, it wasn't a surprise C1P brought out the most detail. In fact, I am inclined to bring down both the Clarity and Contrast sliders in touching up this particular headshot.
RAW file converted in LR on the LEFT and RAW file converted in C1P on the RIGHT. I decided to throw in clothing to show how both are rendered. 
Although I am only a few days into testing Capture One Pro, to me it's clear who has the better raw converter. However, in the next three weeks, I will see which software offers the best user experience. At the moment there are a lot of features I like, but there are other aspects that seem a bit backwards or counter intuitive to me. I'll chalk it up to growing pains for now. Expect a report about my one month trial period in the coming weeks. Only then can I truly say if I find the "upgrade" worth the price. Thanks for stopping by.