Showing posts with label Olympus OMD E-M1. Show all posts

Monday, March 16, 2015

Hiking with the Olympus E-M1 and the 12-40mm f/2.8 Pro Lens - Bridge to Nowhere

I have been a prime lens shooter from the start and to this day I would rather carry two bodies and two primes than carry a zoom lens. Speaking only for myself, I find zooms make me lazy with my composition. Instead of walking back or moving closer to my subject, I tend to use my zoom ring to do the heavy lifting. I can go on and on about my thoughts about zooms vs. primes, but considering my last adventure with my groomsmen and groomsgals, I had no choice but to use my E-M1 and the Olympus Pro Zoom. Why, you ask?  It is my only weather sealed combo and I heard from one of my bestmen (that's right I had 2) the possibility of getting wet was extremely high. He was right, I got wet but my camera did not =). 

On so many occasions I have thought about selling this lens, but this trip made me realize that this piece of glass is a keeper. What particularly stood out was how sharp this lens is after processing my RAW files through Capture 1 Pro (I would export TIFF files from C1P and import to Lightroom, my preferred editor - more on this in another post). Additionally, I loved how close I could get with some of my shots. You will see below some of the close ups I took while on the Bridge to Nowhere hike - a 10 mile round trip hike out in the San Gabriel Mountains, which I highly recommend to all Southern California residents. At the end of the day, I found this lens/camera combo a pleasure to use. While it may be larger than other m43 gear, not once did I feel the weight even after 6+ hours of walking on stones, tightrope walking across creek logs and scaling mountain ledges.    

I want to keep this post short on words, and heavy on images. I had no real processing style for this set. I merely wanted to test out some the cool VSCO presets I've neglected for the past year and a half. I was leaning towards the Fuji and Polaroid sets. Happy viewing 

Meet Vince, our adventure guru and the cousin who is always down to go on an adventure.
The organizer and co-best man 

Sunday, March 8, 2015

A Tribute to my Brother, THE Artist

And....I'm back! Well, sort of. Heather and I are now back to work and trying to come down from our post wedding high. It really has been a tough transition getting back into my groove since there have been a lot of changes going on at work, plus we're being audited (this happens annually). Work on the photography end has been picking up thanks to my buddy Efong over at EmaginePixel - a birthday party last week and a wedding yesterday. I normally would rule out all weddings, but if there is anyone who could get me to be a second, it would be him. 

Now that we are on the topic of weddings, I have been going back and forth on whether or not I should share our montage even before I saw what my brother had done for us. I struggle on whether or not this would be too personal, self-serving or even boring to anyone reading my blog, considering it is about me and my wife. However, the moment I saw the video I felt nothing but pride and inspiration. I have said it before and I will say it again, I never saw myself as an artist. I say this as not to fish for praise but because I feel I merely capture what is around me - the subject itself is art. My brother, Luigi Aranda, on the other hand is THE artist in the family/team because in my eyes he creates. Like individual brush strokes on a canvas, he put together video clips/music/graphics that is not only meaningful but it also drives the whole gamut of emotions. What he did for us was genuinely a labor of love which we are forever grateful for.

Now you must be thinking, how does this all relate to this blog?Well, all the footage he took was taken with either an Olympus OMD E-M1, a Panasonic GM1 or the Panasonic GF3 - mirrorless cameras I rave about all the time. I am incredibly proud of my brother's talents and encourage him to keep it up.

For the video please click the link below.

Tuesday, February 3, 2015

Raw Converters - Lightroom versus Capture One Pro

In my constantly evolving mission to see whether I should be a 3 system photographer, I venture into the RAW files produced by my Fuji X-T1. Before I turn this into another one of my reviews, I will say that when I first opened the raw files in Lightroom, I was taken aback by how smudgy some of the details look at 100%. I have heard reports about how Lightroom version 5.4 (and higher) has done a better job with their demosaicing of the Fuji X-Trans RAW files, but to my eyes it was just shy of being great.  Now don't get me wrong, I still like the files produced by the X-T1 paired with the 56mm f/1.2, but I want to be sure I get the most out of my files even if it means using a different RAW converter.

My initial search for a new converter led me to Iridient Developer. From what I have read online it is one of the best, if not the best converters for Fuji RAW files. The biggest problem - I don't own a Mac computer. ID would have been the perfect tool as it would have integrated with Lightroom seamlessly. As I continued my search, the name Capture One Pro (which I will  now refer to as C1P) kept popping up. I figured it wouldn't hurt to try it out since they offer a 30 day free trial. I am only days into my testing and immediately, I can tell you I have found a difference in the amount of detail and sharpness in my files. I generated a TIFF file from C1P and synced the image in Lightroom to do a one to one comparison. Exposure and color aside, it is pretty clear Capture One Pro is the winner - the screen grab will not do it justice.

Note: all of the screen grabs below have not been edited. All files are at their default setting. 

FujiFilm RAW X Trans File Comparison
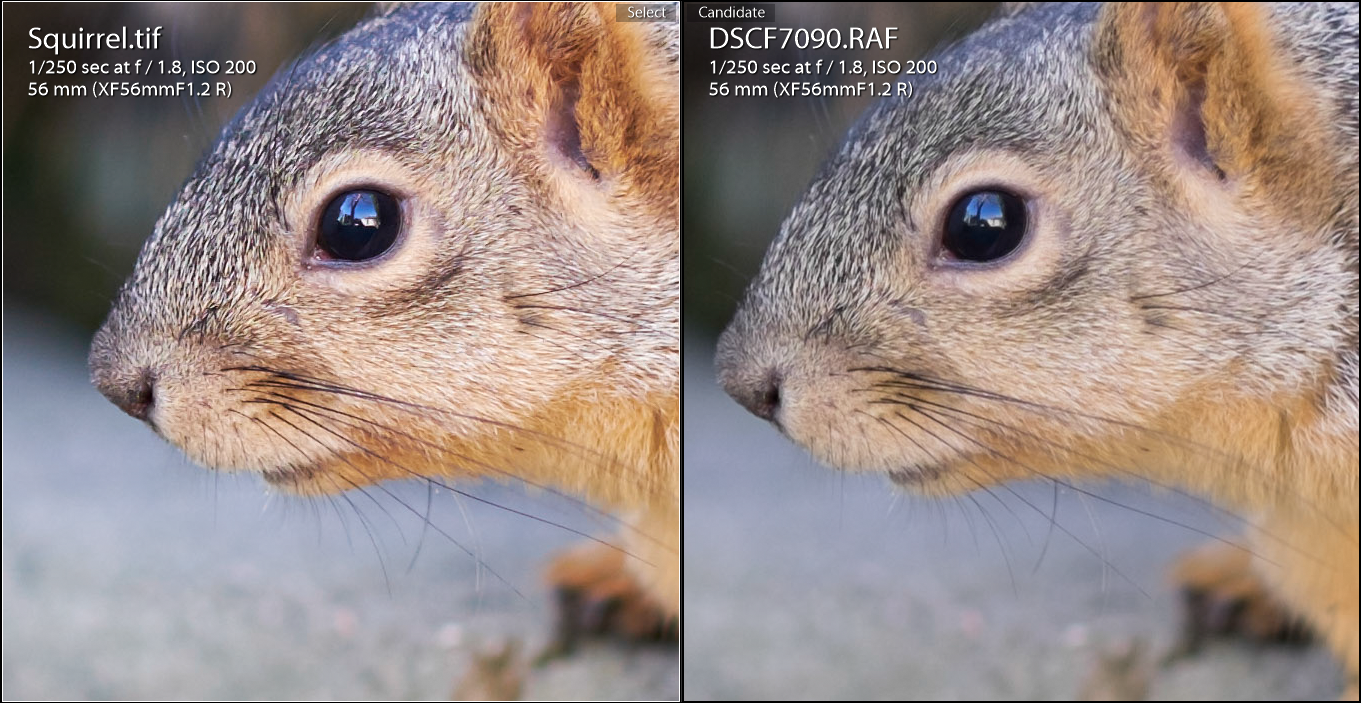
RAW file converted in CP1 on the LEFT and RAW file converted in LR on the RIGHT.  Looking at the fur on the top of the squirrel's head it is clear C1P has far more contrast, clarity and detail. I initially thought I had misfocused, but upon viewing the file in C1P it was clear to me that LR was the "problem"
This immediately sparked my interest and made me consider the differences  in how LR converts my Sony and Olympus files. The results surprised me because I heard the root of the problem was how Adobe products dealt with this files produced by Fuji's unconventional sensor layout. I won't pretend to know coding and/or the demosaic process, but I could only imagine how the arrangement of the blue, red and green pixels could pose a problem. I found a very interesting blog post by ChromaSoft that goes into great detail about the topic if you want to read more about it (I can't comment on the accuracy of the article but it is compelling nonetheless). Otherwise, I will just provide samples from both Sony and Olympus RAW files. 


Traditional sensor layout vs. Fuji X-Trans

Sony Alpha A7 RAW File Comparison

RAW file converted in LR on the LEFT and RAW file converted in C1P on the RIGHT. Like the Fuji files, I noticed far more contrast and clarity with C1P's conversion. The eye shadow and pupil has a lot more punch and the fine details in the skin are more pronounced. Even the rendering of colors are slightly different. From a sharpness standpoint, Capture One Pro is the clear winner

Olympus OMD E-M1 RAW File Comparison

RAW file converted in C1P on the LEFT and RAW file converted in LR on the RIGHT. Given the results I have found with my Sony and Fuji X Trans files, it wasn't a surprise C1P brought out the most detail. In fact, I am inclined to bring down both the Clarity and Contrast sliders in touching up this particular headshot.
RAW file converted in LR on the LEFT and RAW file converted in C1P on the RIGHT. I decided to throw in clothing to show how both are rendered. 
Although I am only a few days into testing Capture One Pro, to me it's clear who has the better raw converter. However, in the next three weeks, I will see which software offers the best user experience. At the moment there are a lot of features I like, but there are other aspects that seem a bit backwards or counter intuitive to me. I'll chalk it up to growing pains for now. Expect a report about my one month trial period in the coming weeks. Only then can I truly say if I find the "upgrade" worth the price. Thanks for stopping by.  

Wednesday, November 5, 2014

Thoughts about Full Frame and Micro Four Thirds/Cropped Sensor Cameras

When I published my post regarding my full frame, Sony A7 camera versus the Olympus OMD E-M1 (a cropped sensor, m43 camera), I knew it would gain some traction, but I didn't realize how much of a response it would elicit. Many have been asking me follow up questions like what I prefer and if I could only buy one which one would I get. While the quick answer is the Olympus OMD E-M1, I believe this requires a qualified response since I have been gearing my business towards more studio and portrait work with off camera lighting. 


A studio headshot taken with the OMD E-M1 - Oly 75mm @ f/5.6
Let's get the technical stuff out of the way first. The Olympus OMD and other micro four thirds cameras have a crop factor of 2. Let's assume I am using a Canon 5D Mark II (a full frame camera I had used this past weekend) with a 50mm prime lens. If I decide to mount a Canon lens on my OMD, the field of view will change to  ~100mm. The crop factor also applies to the depth of field (not light gathering potential). While you will hear a lot of people saying that the strength of full frame cameras is being able to capture an image with a shallow depth of field, I say the strength of m43 cameras is the fact that it has such a great depth of field. Imagine shooting at f/2 on a m43, that's equal to a depth of field similar to f/4 on a full frame camera. 

When shooting groups this extra depth of field truly comes in handy. Not only will I be able to shoot at a lower aperture and still ensure that all people are sharp and in focus, I can as a result bump down my ISO for a cleaner image and/or raise the shutter speed to prevent shutter shock/motion blur. This becomes especially helpful in low light conditions like events and or weddings.


While not really a group shot, the extra depth of field I got when shooting at f/1.4 with the Panasonic 25mm and OMD really helped bring context to this image. 
This is another shot taken from the Rise of the Jack O Lanterns at the Descanso Gardens. Both shots were taken at ISO 800 below 1/30th of a second (hand held).

Monday, October 27, 2014

Full Frame vs. Micro Four Thirds (m43): Sony A7 vs. the Olympus OMD E-M1

The mirrorless world is full of options and I am happy that it is progressing as quickly as it has. I have been fortunate enough to own both a mirrorless full frame camera from the Sony A7 series and what is arguably the best micro four thirds camera out in the market today, the Olympus OMD E-M1. I wanted to challenge all of my fellow mirrorless shooters to see if they can tell the difference from the two cameras under controlled, studio settings. I will post which camera I used in a couple of days.

I think immediately you will notice the difference in skin tones. I purposefully picked these two wonderful ladies as they share a very similar color (I even posed them similarly). In processing the shots, I made sure to use a similar white balance and hue to demonstrate the rendering of both the Olympus OMD and the Sony A7 files. I will let you decide which you like best, but to my eyes it is hard to tell which is which especially when you have good light.    


Tuesday, October 21, 2014

Photography Tip - Flash Sync and TTL FLash

While I have been boasting about the importance of shooting manual everything, whether it’s using flash or using a camera, I do understand there are occasions where being slow and deliberate can sometimes hinder a photographer’s ability to do their job. Case in point, event photography. This is the only occasion where I would not only recommend an automatic TTL flash (through the lens metering - the flash decides the power output based on your camera reading), but I would also recommend keeping the flash ON your camera (unless the venue/client allows for lightstands and off camera flash work). While you can get away with shooting in some auto modes like, shutter priority or aperture priority, I will explain below why I still shoot manually at events. 


From one of my event photography gigs. The flash was mounted on top of my camera at all times. 

Although I used off camera flash for this shot, you can bet I metered for the background first
Most cameras today use a traditional type focal-plane shutter, pioneered by Leitz for use in its Leica cameras which uses two shutter curtains that run either horizontally or vertically across the film or sensor plane. In order for a flash to “fill” or “expose” a sensor/film, the sensor needs to remain completely "open" before the shutter closes. When using a faster shutter speed both curtains are moving along the sensor simultaneously, which is why you may sometimes see a black bar running across your photo. For this reason most cameras can only properly sync with a flash at shutter speeds no faster than 1/200th or 1/250th of a second (I’ll talk about leaf shutters in another post). I will list what sync speeds work with cameras I have used/owned at the very bottom, but for now watch the YouTube video below which explains how the flash relates to the shutter curtains. 


Certain cameras will limit your shutter speed when it knows it has a flash or speedlight mounted on the hotshoe. Before I knew anything about flash, I would shoot in Aperture Priority Mode wide open every chance I could. I once mounted a flash to "try it out" during an afternoon shoot. I knew to properly expose a subject at f/2, I needed a shutter speed greater than 1/1000th. Well, I mounted the flash and was limited to the sync speed of 1/200th. You can guess that all my shots were overexposed because of this. Because of this experience I keep my camera in manual mode so I could adjust the aperture and ISO to compensate for the SS limits.  


This was a very difficult shot to take in that we were under a pier  with very little light. I metered for
what many photographers describe as God Rays. I then added an off camera flash to help expose for the couple.
*A special congratulations goes out to Steve and Lindsay for their recent marriage. 
Now that you know how to sync your camera with your flash, my photography tip for today is to meter for the background. Say you are taking a portrait of your subject at the beach right at sunset. The common thing to do is have your subject pose with the sun in the background - this causes a strong back-lighting situation, so adding a fill flash will be the wise thing to do. Before posing your subject, consider using your on-board camera to meter for the kind of sunset you want and follow these steps:

  1. Set your camera to shutter priority mode (you set the shutter speed manually and your camera selects the aperture & ISO for you) and select a SS that will sync with your camera & flash.   
  2. Fill the frame of your camera with just the horizon (no model). 
  3. Adjust the exposure up or down using exposure compensation
  4. Once you find a shot you like, review the image and take a reading of your Exposure Triangle: ISO, Aperture and SS.
  5. Set your camera to Manual Mode to mirror the settings in step #4. Once you set it you can simply forget it and worry about composition (the key reason why I shoot in manual)
  6. Pose your model and let the TTL Flash expose your subject. 
  7. Adjust the strength of your flash by adjusting Flash Compensation Up/Down. Some cameras have Flash Compensation built into the camera when using a proprietary unit. If you are like me and use third party flashes, you will have to adjust the flash compensation on the speedlight itself.
Unless you want a completely black background (what I wanted in this photo), then you will most definitely want to meter for the background first and then consider adding the light. 
You may be wondering why I meter for the background first and not the subject. Before I knew anything about flash and the exposure triangle, I would get frustrated with my built in flash especially when used at night. My eyes can see the colorful lights and ambiance, but the moment I fire the flash the background goes to black and my subjects look like they’ve been hit with a spotlight. By metering for the background first, you provide context to the picture which makes for a more compelling image. Next time you find yourself at an interesting location, remember to meter for the background first. I hope this helps and please let me know if you have any questions.

So say we all,

Dino


Below is some useful information about the FL-600r  (see our review HERE) and flash sync speeds with cameras I use frequently.


OMD E-M1: The Olympus OMD E-M1 is stated to sync at 1/320th. I can confirm that most of my flashes can in fact sync at this speed. When I use monolights, I tend to drop it down to 1/250th to make sure I don't get the black bands. 

OMD E-M5: While sharing the same sensor as the E-M1, the E-M5 has a flash sync of 1/250th. 


PEN E-P5: A smaller, EVF-less version of the E-M5 and has a flash sync speed of 1/320th. It was one of the selling points of the E-P5 and I can confirm it works .


Sony Alpha A7: Touted for having sync speed of 1/250th (a selling point over the A7r which can only do 1/160th of a second) does not sync at this shutter speed. All my flashes show a distinct black band on the upper half of the frame. You can get away with 1/200th with some cropping, but images are cleanest at 1/160th.

Monday, September 1, 2014

Another We're Alive Inspired Zombie Photoshoot

I currently work at a biotech company in Marina del Rey, California. When I first decided to leave my public accounting firm, I never expected I would join a company filled with creative and enthusiastic individuals, many who share a passion for something starkly different from their line of work. 


Not too long ago, an associate of mine shared with me her love for all things in the horror genre. I immediately had an affinity to her, as I love anything that has to do with zombies thanks to the We're Alive podcast and the Walking Dead comic books. 

Monday, August 25, 2014

Zombies at San Diego Comic Con - Nik Analog Efex Pro 2 Review

Instagram. Hipsters. Passé. Overdone. Bad photography.   These words are commonly used to describe vintage film filters. I’ve been on several forums where I hear photographers complaining about people stealing their photographs and destroying their work by applying said filters. While I will be the first to say I am guilty of using these words in the past and empathize for other photographers, I get the appeal of manipulating photographs to give it a retro flare. But I feel there is a time and place for it. Some think weddings or portraiture is the perfect use. As for me, filters are best used on ZOMBIES. 

Vintage Camera filter with scratch marks

Monday, August 11, 2014

Photography Tip #5 - Shoot with intent (get a tabletop tripod)

And we're back to San Diego Comic Con! In my last post about SDCC (Field Report from San Diego Comic Con - The Mirrorless Movement is in Full Effect), I wrote about my experience interacting with other mirrorless shooters. This time around I want to offer a photography tip.


The Gaslamp District: Tuesday night. Taken before the madness
After going to Comic Con for 5 years, I was thinking of ways to really set myself apart from other photographers who do the typical cosplayer shots. Although there is nothing wrong with it, I wanted to challenge myself by doing something a little different. I knew the easiest way to do this was to change the type of lens I normally shoot with (long telephoto glass) and go as wide as I can. I also wanted to take it a step further by bringing along equipment I hardly ever use - a tabletop tripod from Slik.

Tuesday, July 1, 2014

Canon 5D Mark II vs. the Olympus OMD E-M1 - It's not a matter of what's the best camera, but what's best for you

Not too long ago, I was recruited by a friend to take some studio style shots for an upcoming jump rope competition. To create a uniformed look, he requested that I shoot with one of his Canons, particularly the 5D MarkII.  A little part of me was really excited at the opportunity of shooting with a full frame camera and another part of me was afraid if this will have an ill effect on my wallet. Long story short, I am not convinced DSLRs are the right camera for me. This post is not an exhaustive comparison of the two cameras in terms of image quality, noise levels or other DPreview test factors, rather an explanation of how it fits or doesn't fit into my workflow and personal preference.  I will qualify my statement by explaining below what I do like about using the Canon 5D Mark II or 5D2 for short.

The tiny yet mighty Olympus OMD E-M1
Let’s start with the things I like. I know one of the selling points of a mirrorless camera is the form factor and size. The battery grip is permanently attached to my E-M1 because it not only improves the functionality of the camera, but also prevents my pinky from awkwardly dangling beneath the body. The 5D2 I am borrowing has the battery grip attached to it and I love how secure it feels in my hand even with the 24-105 f/4 lens attached. The buttons also have an amazing tactile feel to it, something that was definitely missing in the OMD E-M5 (but improved tremendously with the E-M1).  I dedicated all of my time shooting manually with the 5D2, since I will be doing so at the competition and I found changing Aperture, Shutter Speed and ISO effortless.  Even more significant was the ability to change said settings including the focus points without having to take my eye away from the viewfinder. Ergonomically and functionally speaking, Canon just hit this camera out of the park.