Wednesday, September 23, 2015

Fuji 56mm f/1.2 Lens Review

I would like to think I have a good grasp of what I want/need in my photography equipment.  I always talk about minimum things a lens or camera must have before I even consider purchasing it. In the past, I have bought several things based on hype or convincing YouTubers and felt burned after spending hard earned money on something that did not fit my needs. The Fuji X-T1 is one example that breaks every rule and standard I have. It does not have “fast” controls (relative to what I am used to), it does not have in-body image stabilization, it has a low flash synch speed and the AF is arguable the slowest out of all the mirrorless cameras I own. Yet, I find myself picking up the X-T1 more times than not. 

My first time using the X-T1 & 56mm Combination under controlled studio conditions. The results definitely exceed my standards
I know what you are thinking, why am I talking about the Fuji X-T1 when the title of this post clearly states it’s a review on the Fuji 56mm f/1.2. In my humble opinion. I feel the 56mm lens belongs to the X-T1 and this lens truly defines the system as a whole. While I have had some time with the venerable 23mm and 35mm glass, nothing has stunned me more than this seemingly perfect portrait lens. 

All RAW files, with the exception to the studio shots, were first converted to TIF files via Silky Pix and then edited further in Lightroom. 
Before I go any further, I must qualify this review by stating one glaring issue if you are a heavy user of Adobe photo editing products, particularly Lightroom. Simply put, I do not like how Lightroom converts Fuji Raw files. There are work arounds to this and is something I have considered and implore you consider if you decide to use this system with LR. You can read my thoughts about Raw converters below. Now that we have gotten that out of the way, let’s carry on with the review.

My Final Thoughts on Capture One Pro 8


Raw Converters: Lightroom vs. Capture One Pro

Auto Focus Speed and Accuracy:

There is not much to say about this lens besides the fact that it is the slowest focusing lens I own. It is safe to say that all Fuji glass I have tried is slower than any OMD or Sony A7II glass (though I must admit I only have the FE 55mm and FE 70-200mm lens) I own. It does have a tendency to hunt in less-than-ideal lighting conditions, but it is mostly accurate. I qualify the accuracy of the focusing because I believe this is mostly operator driven.  Because the focal plane is so thin at f/1.2 and at close distances, the slightest movement can shift the focus from the eye to the eye lash or even the nose. I do feel in-body image stabilization would help for portrait work. As a general rule of thumb, I try to keep my shutter speed faster than 1/100th and I fully depress the shutter release as opposed to half pressing, waiting for the focus confirmation and then pressing the shutter release all the way. These “shortcomings” are by no means a deal breaker. I simply adjust my shooting technique to accommodate the “nuances” of working with a Fuji system. 


Image Quality:

This is by far the most important factor in my opinion and is highly subjective. I try to stray away from speaking matter of fact about image quality since I have a hard time quantifying or measuring the beauty of an image. Speaking only for myself, I am in love with the output from the 56mm. The quality of the bokeh is smooth and does not detract from the image. I have seen other lenses produce distracting and busy out of focus areas, but the bokeh with this glass seems organic and is pleasing to my eyes. Once you run the Fuji files through a RAW Converter other than Lightroom, the files are wonderfully sharp and have a nice pop to them. This lens defines the system and belongs with every Fuji owner. I would go as far to say this should be the first lens you buy if you are a portrait photographer.  I can go on with the superlatives, but I'll leave you with sample photos instead.

RAW file edited in Lightroom. Note: this did not go through the Silky Pix software.
 I believe the only filter I used was the Classic Chrome Fuji setting.

Hands down my favorite shot taken from San Diego Comic Con 2015

Build Quality and Weight:

To me, I believe good weight and bad weight exists in all things whether you are talking cameras, cars, computers and so forth. Size and weight is something mirrorless users tout as an inherent benefit of using this platform and I wholeheartedly agree with this sentiment depending on the situation. If you like to hike and travel, every ounce start to feel like pounds after several hours trekking, so weight becomes an important factor. This lens, in my opinion, can be used for these applications, but is not what Fuji intended. More on that in the next section. A 1 pound (56mm = 0.89 lbs.)  lens on a 1 pound body (Fuji X-T1 = 0.97 lbs.) can feel a bit front heavy and unbalanced. The same can be said about most of Fuji’s new lens offerings. With that being said, the camera becomes more balanced and easier to handle with a vertical grip added. Although I don’t personally own one, I have handled the camera with one on and plan on adding it to my collection in the near future. 


Relative to my Olympus 45mm lens, this is heavy…and I like it a lot. Not only does it feel like a quality piece of glass, I find stabilizing the body easier. The additional weight can mask some poor shooting technique, of which I occasionally exhibit, especially when I push down the shutter release too quickly. Torquing or jerking a light weight camera is a prevalent issue with me so I welcome some heft. Overall, I am impressed with the build quality and believe the 56mm metal construction will last me a long time.   

Philosophy of Use:

I find that all of my cameras serve a very specific purpose and this lens is no exception. I think my Olympus OMD is the only camera I find that is my jack of all trades, master of none camera. While I believe you can get away with doing several types of work with this lens, my personal philosophy of use is portraiture work. I believe the AF speed on this lens precludes it from being a dedicated concert photography lens or an ideal tool for weddings, but it certainly can be done (and I have used it for both types of work). If I had to complain about anything, it would certainly be its focusing speed. Well, that and it has a fairly long minimum focusing distance of approximately 2.29 feet. For deliberate, controlled, portrait work with the Fuji platform, there isn’t a lens I can recommend more than the Fuji 56mm f/1.2. Without a doubt in my mind, this lens has made me a Fuji Fanboy and makes me excited to try/purchase other primes.   


Monday, August 24, 2015

Updates and more reviews to come

I know it has been quiet on the blogging front, but I guarantee you there will be more to report on in the coming weeks. It is definitely a great time to be a mirrorless shooter. For now, I will just post one photo from a recent project. This was taken with the Fuji XT-1 and the fantastic 56mm f/1.2 lens. More to come.


Wednesday, July 15, 2015

Going to San Diego Comic Con with my Fuji X-T1 and Sony A7II

Taken Tuesday evening, the week of San Diego Comic Con.  It is always fun to see SDCC transform right in front of you. I have read articles indicating how important this event is to the local economy. Taken with the Fuji X-T1 and Tokina EL 28mm lens. 
For the past six years, I have exclusively taken a micro four thirds camera with me to Comic Con. It started with the Panasonic GF-1, then the Olympus OMD E-M5 and finally my favorite camera, the Olympus OMD E-M1. My confidence with the system grew and grew with each passing year and I never felt the need to bring any other system. These mirrorless cameras delivered on image quality, speed, usability and most importantly weight. I loved the fact I could walk around all day and never feel burdened by carrying more than 2 or 3 additional lenses. I wanted to change things up a bit this year and see what I could do with a different set up. The the only toll was on my body, as I had to significantly increase the weight of my backpack. Below is a list of all the gear used:

  • Kata KT DL-DR-466 Digital Rucksack (my favorite mirrorless backpack)
  • Manfrotto Tripod MK393-PD
  • Slik SBH-100 Tabletop Tripod
  • Sony Alpha A7II 
  • Sony FE 70-200mm f/4 G Lens
  • Sony Zeiss 55mm f/1.8 Lens
  • Fuji X-T1 - pre firmware 4.0
  • Fuji 56mm f/1.2
  • Zhong Yi Lens Turbo II m42 to Fuji X mount adapter
  • Tokina EL 28mm f/2.8 m42 lens
  • Zenit Helios 44M-4 58mm f/2 m42 lens (my Russian Wonder)
  • 2 Cheetah V850 flashes with triggers
The shallow depth of field really helps isolate this zombie cosplayer. Taken with the Sony Alpha A7II with the 55mm @ f/1.8
While this may seem like a lot of weight, I will assure you it was manageable and I did not carry it all at once. Our hotel room was close enough to the convention hall that I could leave the tripod and FE70-200mm lens in the room and pick it up if I knew I would be working the Gaslamp District. For the most part, I carried only primes with me as I knew I wanted to use a fast lens within the not-so-perfectly lit convention hall. The added benefit of using a fast lens with either an APSC or Full Frame sensor is the ability to separate your subject from the ever so busy background that is SDCC. While "too much bokeh" can get tiresome, I find that it really helps to accentuate the cosplayer I am trying to photograph. The crowds have in many of my shots ruined what is otherwise a pretty cool image.

A panorama taken straight from the A7II. The was really well received by the Killer Pumpkins crew. 
The patience of cosplayers is astounding. They will stand and pose for you without complaining even when guy-with-camera decides to take advantage of a situation and snap more than 20 shots (it happens).  While I can comment on the autofocus speed, I think it is not as important as autofocus accuracy. Being that they are both contrast detect platforms, it is safe to say they are both very accurate. However, I must say the Sony A7II seems to have that slight edge on the Fuji X-T1. I had a higher percentage of perfectly focused (on a subject's eyes) photographs with the A7II, but this was only a marginal difference. It is possible that I was using too slow of a shutterspeed with the X-T1.

Psylocke from the X-Men - Sony A7II with the 55mm wide open. 

That is the glaring difference I noted with the Fuji and Sony cameras. The Fuji could truly benefit from an in-body image stabilization system (IBIS). While I could get away with 1/80th with solid technique, I found most of my shots came out clearer at 1/125th or higher whenever I use the Fuji 56mm. IBIS would certainly help with those minor movements especially when shooting wide open. The slightest bump or shake could shift the focus from the eyes to say the eyebrows.  I was not only able to capture shots consistently  at 1/60th with the A7II and the Zeiss 55mm, but I was also able to keep my ISO down to about the 200-640 range. Speaking only for myself, my future camera purchases MUST have IBIS. Not to say the X-T1 is a bad camera, I just know what I want after shooting several cameras and in-body image stabilization is a feature I would rather not live without.

The world outside of the convention has a significantly different feel.  The characters and cosplayers alike seem to have a different and wild energy. Never a dull moment at the Gaslamp District - Taken with the Fuji X-T1 and the 56mm (Classic Chrome photo setting)
Ms. Sinister. I truly love it when the roles are reversed. Another image
taken with the Sony A7II and the Zeiss 55mm.
Before I come off sounding like a Fuji hater, I can't help but gush over their JPEG output. My dedicated travel laptop only has Lightroom 4, which cannot process A7II or X-T1 RAW files. I don't normally recommend processing JPEG files, I would however make an exception for Fuji's. Simply put they are great straight out of the camera especially with my favorite Classic Chrome photo setting.  In my last post, Concert Photography with the A7II, I talk about how mushy Sony files can look zoomed in. This is a huge plus for me when I have to post photos for Killer Pumpkins, the Company who brought me on board and is the reason why I have access to San Diego Comic Con every year. It is important for me to be able to provide photos that I am proud to present to third parties and you can bet I would rely on Fuji in a heart beat. 

Not really a cosplayer, but more my partner in crime. I am in love with the bokeh quality of the Fuji 56mm lens. 
Overall, I was very pleased with my experience and I have zero regret about bringing two different mirrorless systems.  In fact, this past experience continues to solidify my love for mirrorless cameras. The paradigm shift is becoming more and more evident. I would say that I saw a significant amount of mirrorless owners roaming around San Diego. Of course DSLRs remain supreme and dominates the camera population, but I saw more and more people donning the Sony A6000, a Fuji X-100 variant or various Olympus OMD models.  The following two posts will be photo essays showing my favorite shots from both my Fuji X-T1 and the Sony A7II. As always, thanks for stopping by. 

For images from the Sony Alpha A7II - CLICK HERE
For images from the Fuji X-T1 - CLICK HERE

Tuesday, June 30, 2015

Field Report - Sony Alpha A7II - Concert Photography

The Sony Alpha A7II has been an incredible addition to my collection of cameras. While there is a lot of buzz going around with the A7RII, and rightfully so, I just don’t think I can manage dealing with files that have more than 24 megapixels.  My fellow Canon shooting friend, who happens to be a recent Sony convert, would definitely benefit with all the improvements made to the autofocusing system especially when adapting Canon glass. As much as I would like to comment on all of the A7RII’s improvements, I have absolutely zero field time with it, but I do with the A7II.

The wonderful Jenny Kidd as Alice of the Diamond Mad T Party Band - Testing out gear here is not only entertaining but also educational =)

Tuesday, June 9, 2015

Initial Impressions of the Sony Alpha A7 mark II

Goodbye good friend =)
When the Sony A7 was initially announced, I'll admit I hated on it...a lot. I couldn't get behind the idea of a mirrorless camera that didn't have in-body image stabilization like my venerable and unbeatable Olympus OMD. Not even a year after I published why I wasn't getting an Sony Alpha A7, I bought the A7 after I had spent some time playing around with it at my local brick and mortar. To be honest, I loved that camera. Sure it did not have the fastest AF and it had a limited line native lenses, but it just fit my work flow effectively. Before I was presented with an opportunity to upgrade my A7 to an A7markII on the cheap, I had every intention of keeping the camera for a very long time. In fact, it was on my list of things to review after 1 year of ownership. When presented with the idea of paying only $300 (after selling my camera) to get a Sony A7 with improved autofocus AND in-body image stabilization, I just couldn't pass it up.


First shot with an adapted lens - a Soviet Union lens that I will review later on. Having in-body image stabilization for adapted lenses is extremely helpful. 
The moment I unboxed the A7II, I immediately noticed the weight. The difference was not significant, but it was different enough for me to notice it. How this extra heft will factor in during an 8-hour photo shoot or event, has yet to be determined. However, my subjective sense of quality has definitely risen. 

Thursday, May 14, 2015

5 Day Black and White Challenge

Photography challenges can be a lot of fun and it most certainly can be an opportunity to get yourself out there to shoot. Some of my photography buddies recently challenged me to a five day Black and White project and I happily obliged. I haven't done a photo essay in a long time and just wanted to share my five favorite shots from the challenge. I made an attempt to really try something different. All of the following shots were taken with the Fuji X-T1 in RAW and converted in Silky Pix. 

As a side note, I have been really pleased with the output from Silky Pix. Although I find it not as sharp as Capture One Pro, it does a good enough job for me as a pure RAW converter. Of course you mileage may vary.  As always thanks for stopping by.

Meet one of my best friends, Jeff. This was taken at the dessert at high noon. I knew his hair and sunglasses would provide a lot of contrast so I decided to blow up the highlights. While I normally try to preserve the highlights, I opted to do just the opposite. This was taken with the Fuji 56mm
Macro was never my strength, so I decided to give it a shot on my second day. This miniature toy skateboard was found around my complex. Just one of the many lost toys I found. This particular shot was taken with the Super Takumar 50mm macro lens adapted on the Lens Turbo II Focal Reducer. 
Another lost toy I found in my neighborhood. If memory servers me right, this is an amber tone B&W conversion. I am really beginning to like this look and plan on using this process in future edits. This shot was taken with the Super Takumar 50mm macro lens adapted on the Lens Turbo II Focal Reducer. 
I received this all metal Wall-E statuette from my brother for Christmas. This has inspired me to take him with me as a part of my future photography project. The Takumar 50mm macro has been a stellar performer and I just wish I could get in just a little bit closer to my subjects, but I won't really complain about a $90  investment that is this sharp.
Obligatory muse post. The rendering of the Fuji 56mm f/1.2 lens is truly something else. Part of the reason why I have spent a lot of time with the X-T1 is this particular lens. While I think the 23mm is a spectacular lens, I think the 56mm is exceptionally good.
I know I mentioned this was a five day challenge, but I decided to throw one in from Heather's set. I have been really impressed with some of her work and this shot is no exception. I liked her use of framing within a frame and its overall ominous feel.

Friday, May 1, 2015

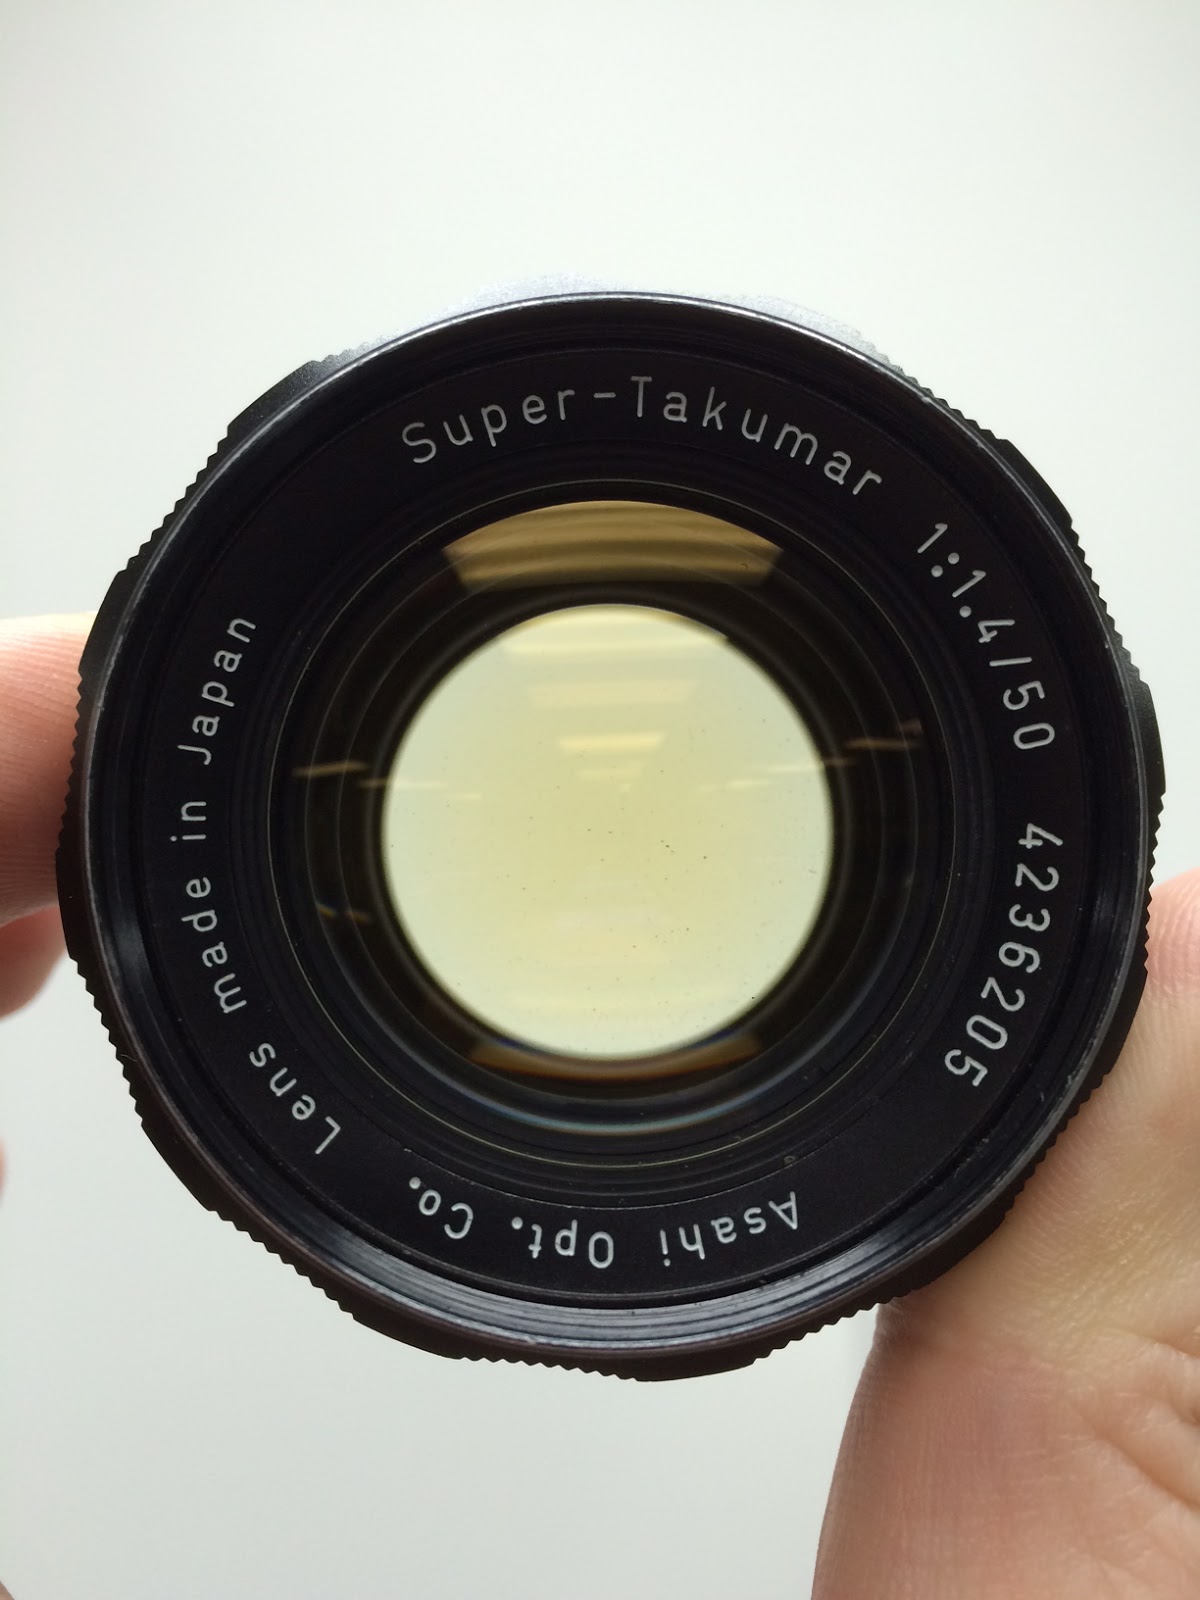
Radioactive Pentax Super Takumar 50mm f/1.4


To those who follow my blog (thank you), you will know I am a huge fan of vintage glass. There was a time I had more manual lenses than I did native mount, autofocus gear. Call me glutton for torture or a hipster, I just find them extremely fun to use. After spending time in different photography forums, I would hear people talk about the one glass every vintage prime lens fan should own and that is the Super Takumar 50mm f/1.4 (the m42 mount variant). When I took delivery of this lens, I was shocked to find a very noticeable yellow tint. I originally thought it was a defective unit but after a little bit of googling I later discovered the yellowing is a byproduct of the radioactive gas within the lens itself. That's right, RADIOACTIVE. According to www.pentax-manuals.com this is what is causing it: 
Apparently the atomic structure of the glass is altered by radiation from trace amounts of radioactive thorium in one rare-earth glass element, creating the yellowish-brown color; and this change is reversed by exposure to ultraviolet light.
The yellowing problem affects the Model II 50mm f1.4 Super-Takumars and all other 50mm f1.4 lens through to the K-mount series. The older Model I 50/1.4 Super-Takumars, the 8-element ones (which can be distinguished by the protruding element at the rear NOT having a protective metal rim), do not turn yellow because they do not have the radioactive element, using an Additional regular optical glass element to get higher refraction instead. 
Untreated glass straight from the seller
Lucky for me I work at a facility where I have access to a portable UV light device. With the help of my fellow co-worker, we decided to conduct our very own un-scientific experiment with an extremely poor documentation process. Because this was done at work, I did not have my camera handy. Instead we decided to use his iPhone to record the progress after each day. While I understand we did not use the same white balance and camera settings for each shot, I can attest for the differences and the pictures are demonstrative of our findings. The UV light device had two settings for long and short wave. Without any kind of research we started with a 24-hour treatment of short-wave ultra violet light. It seemed to have lighten the yellow tint but it's still clearly present.

After 24 hours of direct long-wave UV light treatment
Short wavelength UV light seems to be good at killing bacteria but ineffective at passing through glass, plastic and the earth's atmosphere. The sun is a great source of UV light and is one of the known ways to treat thorium tinted glass, but requires a more intricate setup and exposes your lens to the elements - something that can do more harm than good to an old lens like the Super Takumar.  We decided to change the setting to long wave UV light and it had a greater impact.


After 24 hours of long wavelength ultra violet light
Total 48 hours of exposure


After another 24 hours of long wavelength ultra violet light
Total 72 hours of exposure
As you can see, the Super Takumar lens has been cured of its yellow tinting. Part of me wishes I could have taken sample photos of a test chart showing the effect of the thorium tint, but this was done on a whim. I thought this was a neat little experiment that hopefully can help others wanting to rid themselves of this “problem”. I hope this helps and happy shooting.

This was the model UV Light used for the "experiment"
Note: I have seen others use an Ikea lamp with great success. I can't say for certain the UV light is what removed the tinting but it definitely yielded favorable results after our 72 hour treatment.

Friday, April 17, 2015

My final thoughts on Capture One Pro 8 and Fuji X-Trans Files

Note: I decided to use my photos from a recent trip to the Angeles Range at Lake View Terrace, California. This photo set demonstrates the amount of detail you are able to extract from a TIFF file once it has been converted from RAW. The range is set up so shooters are comfortably shaded under a long awning, while the targets are out in the open sun. Metering appropriately was extremely challenging, but you will see below that Fuji files have amazing dynamic range. All RAW files were imported into Capture One Pro 8, converted to TIFF files and imported to Lightroom for editing. Gear used: Fuji XT-1, Fuji 56mm f/1.2 and an adapted Olympus OM 24mm f/2.8

To see my previous post on Capture One Pro, click HERE

An HDR sample using three TIFF files (slightly over-cooked). Nik software was used to combine all exposures
I have spent a significant amount of time working with Capture One Pro 8 (C1P for short) and in my opinion is a far better raw converter than Lightroom 5 (LR5 for short), whether I am using Sony, Olympus, Panasonic and/or Fuji files. The files just seem to have more punch, detail and clarity - things that are extremely important to me when I deliver files to clients. While some may argue that C1P has a good starting point and that LR5 with some tweaking can get to where they want, my experience suggests otherwise. Pete Bridgewood offered some great sharpening tips for LR5 that has greatly improved Fuji Raw files, but not to the same extent as C1P to my eyes. I started to notice some artifacts in my out-of-focus areas but only at the pixel peeping levels. 

I ended up going to the range with the same co-worker who bought a Fuji X-T1 based on limited use with mine. Instead of using a dedicated scouting scope to determine where our shots land, we used the Fuji X-T1 with a terribly inexpensive Rokinon 500mm, fixed aperture mirror lens.  Optically it is nothing to write home about, but as a component for a "digital" scout scope, it worked perfectly. Due to the crop factor you get an effective field of view of 750mm. You can essentially double your range by using the magnify zoom feature. I would have never thought to do this and I'm glad he taught me another way to use my camera. 
This is a Remington 700 bolt action with an upgraded Arctic Stock. Very cool toy. For this particular shot, I did a middle of the ground metering - pretty much an average of the highlight and shadow regions. There is definitely a lot of room for recovery.

For this particular shot, I metered for the shadow areas (my co-worker). While it may seem like I had lost all of the blue in the sky, this particular time of day was overcast and gloomy. 

An hour into our range time, the clouds parted and the blue sky made an appearance. I decided to swap to my Olympus 24mm with an intent to get a little more context of the range. I metered for the hills with intent to recover the shadows. In my opinion, it did an admirable job. What do you think?
So the million dollar question: Will I transfer my post processing workflow over to C1P. The answer is unfortunately, no. Simply put, I couldn't get behind the user interface. The functionality was very backwards to me and I spent a good amount of time trying to navigate the controls.  While I liked some of the features such as the color correction wheel and color blending, I found it very lacking in the portrait touch up department. A good portion of my work is portrait photography and I fix minor blemishes very quickly and seamlessly in LR5. I find Adobe's algorithms for healing and cloning at the top of its class. I spent a good half hour trying to edit a client headshot and I could not effectively clean up the file to my standards. This ultimately made my decision for me. I primarily blame myself for not being proficient with this tool, but for what it's worth, I found the LR learning curve to be extremely low. 

This is an example of a shot where the lighting was ideal. Enough light was coming to the shooters right creating a balance, so to speak, of light. Uploading the Raw file directly to lightroom left me feeling unenthused due to the muddy details. I know I shouldn't pixel peep, but it's a way to benchmark my files. 
I added this only because I don't get many photos of myself, especially doing something cool as skeet shooting. 

Part of me feels I did not give C1P a fair shake, but I just couldn't "invest" the finite amount of time (and money) I have to a new program. What honestly put the nail in the coffin for me was Fuji's recent release of their own Raw Converter (using the Silky Pix platform). Although I find C1P far more sophisticated and "sharper", Fuji's software was good enough for my needs and more importantly it is free. I will follow up this post with more examples from Silky Pix. 

-Dino

Note: By converting your raw files to TIFF, I noticed I lost my ability to use the popular camera profiles Fuji is known for. I personally am a huge fan of the Classic Chrome profile and not being able to utilize it as a creative tool was a little disappointing. If anyone knows a work around for this, I would greatly appreciate the advice


Monday, April 6, 2015

My Love Affair with Fuji - An Instax Believer

Don’t tell Olympus or Sony, but my love affair with the Fuji brand is growing with each day. Although I have been writing about the Fuji X-T1 quite a bit, I would say it is their offering of instant film products that has me head over heels. Their X-series mirrorless cameras have impressed me thus far, but still have a lot of room to improve like all mirrorless cameras. For now, I am blissfully using it as another photographic tool, but I will save that for another post.


What is it about the Instax products that appeal to me so much, you may wonder. Before I started shooting in the digital age, I had a point and shoot film camera that I pretty much took everywhere I went – from family gatherings, middle school dances to our local ice skating rink. It was small, easy to use and created physical memories that I could hold on to and enjoy with my friends/family.


Dropping off film at my local Target and waiting an hour for it to develop was similar to the anticipation of opening presents on Christmas Day. I even bought Fuji 800 Speed film packs mainly because they were more affordable than Kodak. Out of focus, motion blur, discoloration were all acceptable to me just as long as the subject was interesting. In the digital age, I notice I obsess more about sharpness, color, chromatic aberration, moirĂ©, vignetting and all the other factors that I probably shouldn't really be paying much attention to. With film we often hear people describe its inherent flaws as characteristics of the medium. Don't get me wrong, I would still rather work with the digital format, but in my eyes there’s still something appealing about film and it's ability to create something tangible without the need to post process. 

We learned the hard way, not all Sharpies are created equal. If you plan on writing on the Instax prints make sure you use the permanent ink variant (as labeled on the pen) as to avoid smearing.
For our wedding project, we decided to avoid powering the Fuji SP-1 printer with batteries.  Instead we opted to use a CAIUL USB Power Cable (available on amazon for ~$13) and an external rechargeable battery pack.  In my opinion, this is a more reliable way to power the printer

Fuji is able to scratch that film itch and continue to give me something physical to enjoy again. I raved about my recent acquisition of the SP-1 printer - Click HERE for my review.  I loved it so much, I even found a way to incorporate it in our wedding, which had a photography theme. My lovely fiance, now my wife, gave me the green light to buy over 200 sheets of Instax mini film and we printed out table cards for all of our 170+ guests. In the digital world, where all of our photography is mostly shared on Google+ and Facebook, it is so refreshing to share our work through a tangible medium. Even though the print quality will never match that of a professional grade printer, it is still something people can spend time holding, examining, and keeping for years to come. Many have commented that these table cards were a unique way of displaying our Disney photography and showing off our personality. To this day, I see these table cards posted on our friends'/family's refrigerators. 


A special thank you to Efong Chiu over at EmaginePixel for taking these photos. Pinterest gave us the idea of using a canvas to hang all of our prints (painted by our amazingly talented brother, John Pelico III).  We stapled and taped string across and hung them with mini clothes pins (eBay is the best place to get these pins - I got 200 for under $20). A table top easel was used to keep the painted canvas upright.

Fuji's contribution to our wedding didn't end there. We asked our usher to take candid photographs with the Fuji Instax 210 camera. This camera should not be mistaken with the mini versions that take the same film packs as the SP-1 Printer, Mini 8 or the hipster-friendly NEO 90. In my opinion, the 210 wide film is a much more favorable format at 9.9cm x 6.2cm than say Polaroid's 7.5cm x 7.5cm. For some reason, I just can't get behind the square format and is the sole reason why I do not use Instagram on a regular basis. Besides being more conducive for portrait, landscape and group shots for my style of photography, the film packs are significantly more affordable than Impossible Project's (a third party manufacturer who is known for making film for Polaroid cameras) and are far less temperamental. I have a hard time recommending Polaroid to people who want to get into instant photography especially after what I had seen on the Tony Northrup YouTube channel. 


Our custom made, Etsy ordered, wedding album dedicated to Fuji Instax products
Heather and I invested (and I wholeheartedly mean the word invested) in an additional 200 sheets of wide film and boy did it pay off. Our Usher went above and beyond what I had originally intended and spent the entire night documenting the festivities...that is until my father punched the camera out of his hand while dancing with my Mom. Although the camera did not survive the accident, we were able to walk away with over 150 frames and we are incredibly excited to build our wedding album/scrapbook.


The opening page to our book. All the photos were developed with the FujiFilm SP-1 Printer. A special thanks to Rachel B. Photography and EmaginePixel for  their great contributions to our memories
The wide prints fit perfectly in our album. We used adhesive photo corners, which can be purchased at any arts and crafts store, to adhere the photos to our album.

Just a small sample of our Instax collection. Instead of having our guests sign a guest book, we had them leave us a message on the Instax photo themselves. It makes sifting through these photos a much more enjoyable experience. 

On my main website I have a tagline that states: "A good photo is an investment that doesn't lose interest". In fact, I believe photographs are one of the few things that gain exponentially more personal  and sentimental value as time progresses.  I may sound a little too adamant, even dogmatic, about printing, but I have come from a place where I almost lost 1 years worth of photographs due to a failed hard drive. Our memories should not live and die on our computer and the Fuji Instax products help me easily and conveniently practice what I preach. To date, no other company is able to scratch my nostalgic film itch at such an affordable price point. After spending thousands of dollars on a wedding, it is so nice to be able to instantly enjoy and reminisce one of the happiest days of my life. My wallet typically follows my heart and at the rate Fuji's going, they will continue to keep me as a loyal customer.